
Ultimate Beginners Guide to Dryer Vent Cleaning
Many American homes have a clothes washer and dryer. The convenience of those appliances is undeniable, but so is the risk posed by poor dryer maintenance and failure to keep the vent free of lint.
Most homeowners know to clean their dryer’s lint trap regularly, but how often do you clean the vent? Do you even know how? Let’s look at the process of dryer vent cleaning to keep your dryer running well and your home and family safe.
Is Dryer Vent Cleaning Necessary?
On average, almost 3,000 dryer fires occur each year. Aside from the economic costs of fire damage, people also lose their lives in dryer fires. The shame is that more than a third of these dryer fires are preventable simply by cleaning dirty dryer vents before accidents happen.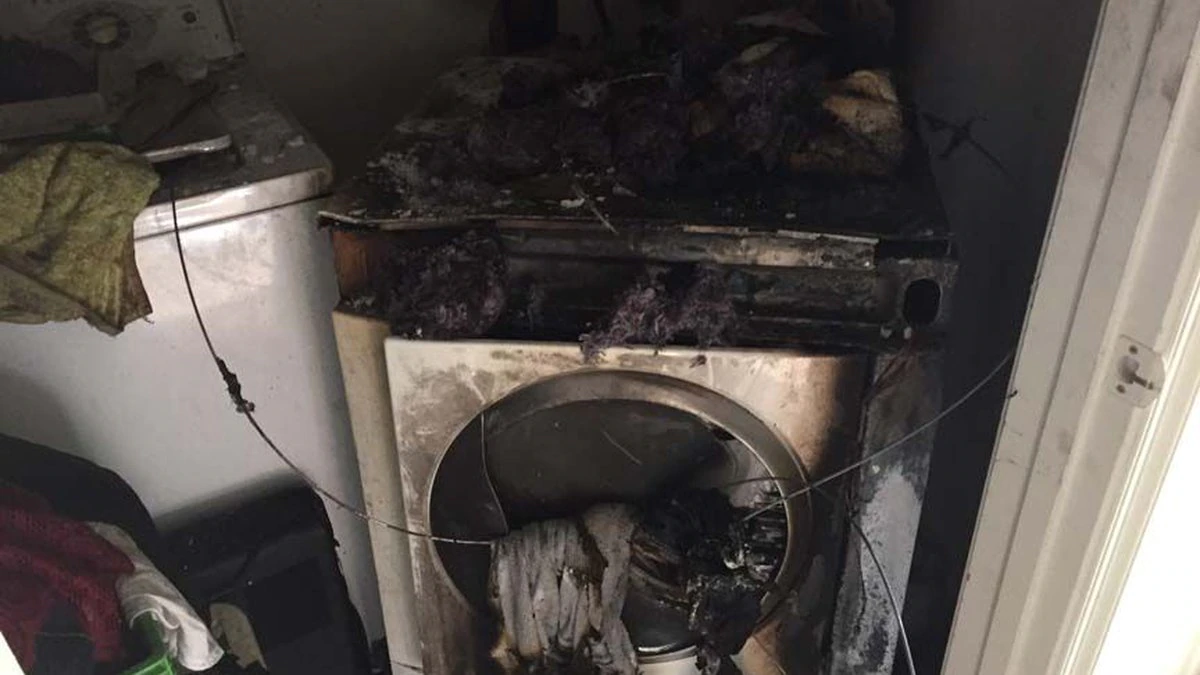
Dryer vents aren’t complicated, but they can become clogged with lint without proper maintenance, creating a fire hazard. Even if you have a fire break out in your home that’s unrelated to the dryer itself, the lint in a dirty vent can become fuel for combustion, helping the fire spread.
Therefore, dryer vent cleaning is necessary if you don’t want to run into an increased risk of burning down your house and injuring or killing a family member. If you are unsure if your dryer vent needs to be cleaned, then review the signs of a clogged dryer vent.
Dryer Vent Cleaning Shopping List
- Vacuum
- Screwdriver Set
- Hand Brush
- Damp rag or mop
- Dryer vent cleaning kit
- Electric Powered Drill
- Ladder or step stool
- Foil tape (for sealing any small leaks)
Dryer Vent Cleaning: Getting Started
Before you can capably clean your dryer vent, you should get a handle on the big picture.
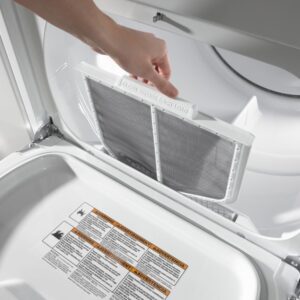
Inside your dryer, there is a lint screen or lint trap. Your dryer might even have a warning chime or indicator light reminding you to do so. Typically, the lint trap is near the door. You should empty it regularly or after each dryer cycle is completed according to your manufacturer’s instructions.
Sometimes, even with proper cleaning, lint will get past the screen and end up in the dryer duct that expels hot air from the appliance to the outside of your home. If your lint screen is overwhelmed with lint, even more will build up inside the pipe.
If you let it go too long, you will have to unclog the vent. That is much more involved than a simple, periodic cleaning for preventive maintenance.
So, look for a duct or pipe coming off the back or side of your dryer, running to the outside of your house. You can also look for a vent on the outside wall or your roof to find where the exhaust vents to the outside.
PRO TIP: To easily find your dryer vent on the exterior, turn your dryer on and look for the exhaust vent that is open or blowing air through it.
You may need a flashlight to see around the dryer if it’s in a dark area and a step stool if it’s hard to peer over your dryer. Be careful not to lean on the top too hard, or you could dent it. And before you start doing anything else, make sure to unplug the appliance for safety.
PRO TIP: To see the back of your dryer’s vent transition without the use of a flashlight or a step stool by using your camera on your phone with a flash!
It may be necessary to move the dryer a bit to access the vent. So, it may help to have a partner assist you in shimmying the appliance away from the wall. If your dryer is sitting on hard wood floors or a surface that easily scratches, then try to put furniture pads on the feet of the dryer or slide a piece of cardboard underneath to avoid damaging your floors.
If you’re uncomfortable with any part of the process, consider contacting a dryer vent cleaning company and letting an experienced technician tackle the job.
Dryer Vent Cleaning: Step-by-Step
Now that you know what you’ll need and understand the concept, let’s get to work. Make sure to read all the way through the process before you get started. Otherwise, you might not be prepared for the whole job.
![]() Disconnect the Dryer
Disconnect the Dryer
You should already know where the vent and the exhaust port on the outside of your home are. Now, make sure the dryer is unplugged, and if it is a gas model, shut off the supply valve then use a wrench to disconnect the gas line. It should be nearby.
Move the dryer enough that you can access the vent. Disconnect the vent from the wall and from the appliance using a screwdriver. There’s typically a band-clamp holding it in place. This video will show you what to expect when you start work.
![]() Start Cleaning
Start Cleaning
Carefully bring the vent outside so you don’t spill lint in the house. You can shake out and manually remove any large debris. Now, run your vacuum and thoroughly clean the inside using your longest attachment. When the vent hose itself is clean, set it aside.
PRO TIP: Use your dryer vent cleaning kit and your powered drill to clean the transition hose. Just connect two rods and a brush. Run the rotary brush through until properly clean.
 Clean the Attachment Points
Go to your outdoor vent cover. Vacuum it clean. Now go back into the house and vacuum clean the inside of the vent port on the wall. Finally, vacuum the vent on the back of the dryer where the vent pipe was attached.
PRO TIP: To clean these with ease, simply use your hand brush. Some of the lint may be hard to get off since it was sitting on the openings for a long period of time. Simply use your hand and scrape off the hard to remove lint.
 Use Your Dryer Vent Cleaning Kit
Here’s where the dryer vent cleaning kit in the materials list comes into play. If there are sections of your dryer vent pipe that you can’t reach with the vacuum, your kit will have a brush on a long, thin wand. Attach this to your powered drill. Make sure you read the directions on the dryer vent cleaning kit, so your attachment doesn’t come undone inside the vent. The cleaning wands are flexible enough to move around the contours of your pipe, so thoroughly clean and remove any lint build-up. Keep adding extensions to the lint cleaning tool until your brush makes it to the exterior.
PRO TIP: Use only the forward direction on your drill when you have your brush attached. Using the reverse on some dryer vent cleaning kits will cause the extensions to come off! For peace of mind and extra precaution, just use duct tape on the seams of each extension to ensure it doesn’t fall apart on you. There are also dryer vent cleaning kits that lock together. We highly recommend these!
Re-vacuum if necessary. Now is also a good time to thoroughly clean the dryer lint screen with a brush and vacuum.
 Look for Issues
Inspect your vent and ducts. If anything looks damaged, or if you suspect the vent itself is very old or out of code, consider replacing everything with new hardware. It’s not expensive, and it’s a simple project most homeowners can tackle on their own.
If you aren’t sure, you can handle it, most dryer vent cleaning services will offer an inspection and can fix or replace the vent for you.
If installed in a closet, you need to have additional airflow around your dryer. Most major dryer manufacturers recommend extra ventilation and space around the dryer if it is in an enclosed or recessed place. So, keep an eye out for dust accumulation on louvered doors and other air vents, and make sure to clean these areas as well.
 Put Things Back Together
Reassemble your dryer vent. The complicated and messy part is over. Now slip your clamp back over the end of your dryer duct and reattach it to the wall port. Push the clamp over the end of the duct, so it makes a good seal and re-tighten it. Repeat the process on the dryer end.
PRO TIP: After securing your dryer vent hose with your adjustable clamps, take about 12 inches of foil tape and wrap the hose and clamp at the fitting to ensure it does not come apart on you.
Now is a great time to use your vacuum, a damp rag, and maybe a mop to clean the area under your dryer and the little voids around it. You might even find a couple of missing socks!
Push the dryer back into place, plug it back in, and turn the gas supply valve back on (if necessary). Make sure the dryer vent transition hose is not kinked or binding! If this happens, your dryer will not vent the lint and the excess heat. This will cause your dryer to overheat and/or rapidly build up lint in the transition hose.
It’s a good idea to run a quick test cycle of the dryer by running it on a short cycle, just to make sure everything is tight. Look and feel for any leaks. With the dryer still on, make sure you have air flow on the exterior exhaust vent. If you do not, then you either have a leak or your transition hose is kinked! Fix this immediately.
PRO TIP: If you have a gas dryer and you removed the fittings, you want to check for leaks. Take a spray bottle, fill it with water, add Dawn dish soap and spray the fittings to make sure there are no leaks. If there are leaks, then bubbles will form. Use plumbers’ tape around the fittings if a leak is detected and re-attach gas line and spray with soap again.
 Finish Cleaning Up
When everything is back in place, consider vacuuming and mopping the area, just to ensure you didn’t miss any lint.
More issues to look out for
During your dryer vent cleaning and inspection, keep an eye out for other issues.
Is the dryer exhaust duct on the outside of your home working correctly?
Most outdoor ducts have louvers that flap shut when there is no airflow from the dryer. Make sure the louvers are all in place and attached and that they seal well when the dryer is not in use and open easily under pressure from the dryer’s exhaust. It is important that these vents close properly because they are a perfect entry point for mice and other rodents! If you live in a colder climate, then you may notice a draft in your dryer if these are not properly closed as well.
PRO TIP: Never use a screen over an exterior dryer vent termination. It will trap too much lint and it will become an immediate and significant fire hazard. Some big box stores sell these vent covers, and we highly recommend you avoid them.
Are there screws in your dryer vent?
Hopefully, there aren’t any screws holding your dryer vent together. If there are screws used to secure sections together, they likely protrude into the dryer vent itself and risk catching lint. If you find screws, you should consider replacing your vent immediately! 
PRO TIP: Dryer vents should only be held together with HVAC foil tape! If it is held by anything else, either remove it or call in a professional to repair your dryer vent.
Is the dryer vent well supported to the wall or ceiling joists?
A new dryer vent that spans more than a few feet requires some support to prevent sagging. There are various ways to do so, but typically you can purchase metal hanger straps at a hardware store to make it easy. Depending on the material you are securing your dryer hanger straps to, then you may either need some 1” construction screws or concrete wall anchor screws.
Always put a hanger near the middle of the run. For example, if you have an eight-foot run of pipe, put the hanger at the four-foot mark. Space the hangers out evenly so the weighty is distributed evenly.
Don’t Let Lint Build up Again
Regular maintenance is key to keeping your dryer running well. Routinely performing a few simple tasks will help keep your dryer vent clean and help prevent potential fires. A build-up in dryer vents can be deadly.
- Sweep, dust, vacuum, and clean around your appliance regularly. Don’t let dust and debris accumulate around the dryer.
- Every time you use the dryer, clean the lint trap—doing so before each cycle will make your dryer perform better, as the airflow will be uninhibited by lint build-up. It only takes a few seconds and makes a big difference in performance. It also will help keep lint from blowing into your dryer vent.
- Make a point to routinely remove the lint trap or screen and vacuum around its housing. By cleaning this area prone to accumulating dirt, lint, and debris, you’ll further reduce the amount of lint that can get around the filter and clog your vent or cause a fire.

Frequently Asked Questions
These questions all come up quite frequently when talking about dryer cleaning. Let’s see if we can answer them all to make things easier for you.
How Many 90 Degree Elbows Should My Dryer Vent Ducting Have?
The best answer is that there should be as few bends and elbows in your dryer vent as possible. Each time your vent changes direction, you create a restriction on the airflow and a potential point for lint to build up. It is best to pull up the IRC code for dryer vents and follow this dryer duct construction code.
If your dryer vent is sagging or has unnecessary elbows, you should consider replacing the vent. Whirlpool recommends that each 90-degree elbow requires reducing the maximum vent length by five feet. They recommend a 2.5-foot reduction for 45-degree elbows.
Consequently, if you have a long vent with lots of bends, you’re probably going to need a replacement or dryer vent repair. In some instances, if your dryer vent ducting is far to long then you will need to have a licensed professional install a dryer booster fan to bring your ductwork up to code.
Can I Clean My Dryer Vent Myself?
Yes, you probably can. Some dryer installations make accessing the components a little bit difficult. But with some patience, hand tools, and maybe a helper, this is a relatively easy home maintenance task. If you are unsure if you want to DIY this yourself or hire a professional, it is best to read our when to hire a professional dryer vent cleaner article.
If you decide it’s above your pay grade, don’t just skip it. Bring in a professional and get a regular cleaning schedule. It’s safer and more efficient. The cost of dryer vent cleaning by hiring a professional do it for you is very reasonable.
Can I Use PVC to Make a New Dryer Vent?
Absolutely not! PVC pipe is not allowable by any standard for use as a dryer vent. You also should never reuse older dryer vents, as they may have design flaws that trap lint and moisture. Any pronounced sagging is a bad sign and warrants the replacement of a vent. 
What Should My Dryer Vent Be Made From?
Dryer vents should be metal. The inside should be smooth, so it’s harder for lint or moisture to accumulate. If you need a long vent to reach the exterior of your home, you may have to install additional connectors to bridge two sections of your vent. Make sure there are no air leaks when your dryer is running. Any leak is dangerous and inefficient. 
PRO TIP: If you find that your dryer vent is constructed with just the foil type ducting, aluminum extendable ducting or plastic coiled ducting, then have it replaced immediately. This is not up to code and is very susceptible to clogs, tears and can be very flammable material.
How do I clean underneath my lint trap?
This is an area of the dryer vent cleaning process that is often overlooked by DIY’s and professional dryer vent cleaners. Typically, when your dryer vent is clogged the lint has no where to escape so it starts to build up inside your dryer and under your lint trap. This needs to be cleaned! The best way to clean this is with a dryer lint vent trap brush and a dryer vacuum attachment. This should be routinely cleaned once a month to avoid build up of lint.
What Else Can I Do to Keep My Home Safe?
Consider taking a few other steps to maintain your dryer and keep things as safe as possible.
- Your laundry room should have a fire extinguisher installed within it, or at least nearby.
- Always remove any visible lint from the dryer drum, the lint trap, and the trap housing before running the dryer.
- Never leave the dryer on while you are out of the home or asleep.
- Install a smoke alarm in or nearby the laundry room or area.
- Install a Carbon monoxide(CO) alarm in or nearby the laundry room or area.
- Always follow your dryer manufacturer’s operating instructions and don’t overload the appliance.
- Consider regular inspections of your appliance by a professional, especially if you are using a gas dryer.